How to Use a Data Table with C++ in Unreal Engine 5
Overview of how to consume a data table in UE5 using C++
Game Engine
Unreal Engine 5.5.3
IDE
Rider 2024.3.5
Project Name
MyProject
OS
macOS Sequoia 15.3
Data tables have always interested me, they're extremely valuable, but I've never dug into them so I took so time to grasp the basics in C++.
To create a data table we first need a struct. Either in Blueprints or C++, a struct is mandatory. We can create a USTRUCT in C++ so we an easily reference it in another class.
So first, create a new USTRUCT that extends FTableRowBase. The FTableRowBase is required so we can create a data table later on. For testing purposes I'm creating a fake weapons data table to showcase meshs, colors, names, and other stats. The comments above each property will be tooltips in the editor.
MyWeaponsStruct.h`
#pragma once

#include "CoreMinimal.h"
#include "UObject/Object.h"
#include "MyWeaponsStruct.generated.h"


USTRUCT()
struct FMyWeaponsStruct : public FTableRowBase
{
	GENERATED_BODY()

	/** Name of Gun */
	UPROPERTY(EditAnywhere, BlueprintReadOnly, Category=Weapons)
	FString Name;

	/** Gun Skeletal Mesh*/
	UPROPERTY(EditAnywhere, BlueprintReadOnly, Category=Weapons)
	USkeletalMesh* SkeletalMesh;

	/** Material Color */
	UPROPERTY(EditAnywhere, BlueprintReadOnly, Category=Weapons)
	FLinearColor Color;

	/** Damage */
	UPROPERTY(EditAnywhere, BlueprintReadOnly, Category=Weapons)
	float Damage;

	/** Bullet Range */
	UPROPERTY(EditAnywhere, BlueprintReadOnly, Category=Weapons)
	float Range;

	/** Fire Rate per Minute */
	UPROPERTY(EditAnywhere, BlueprintReadOnly, Category=Weapons)
	float RPM;

	/** Magazine / Clip Capacity */
	UPROPERTY(EditAnywhere, BlueprintReadOnly, Category=Weapons)
	float Magazine;

	/** How Long to Reload */
	UPROPERTY(EditAnywhere, BlueprintReadOnly, Category=Weapons)
	float Reload;
};
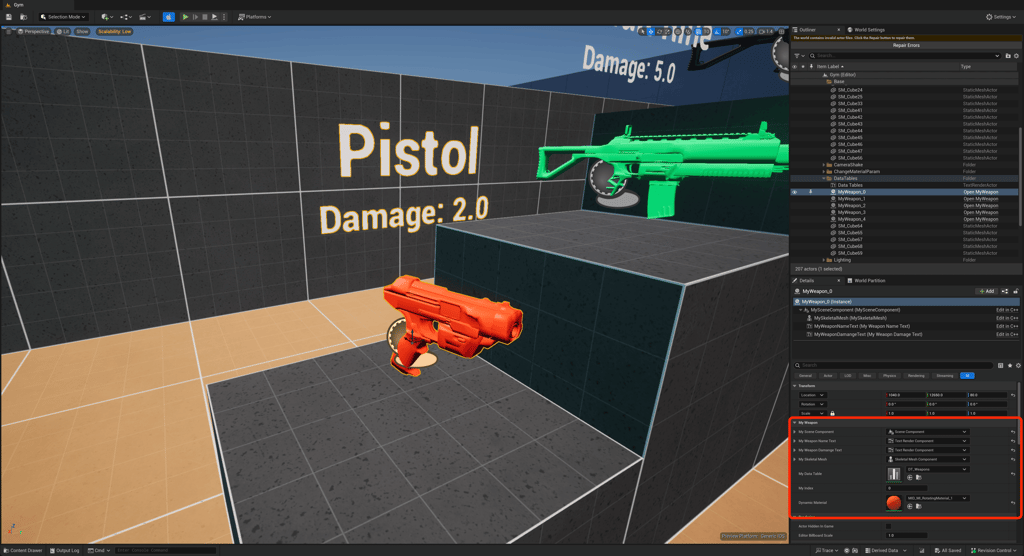
Next, we can create a weapon actor that will consume the data table. I'm adding a USkeletalMesh, UTextRenderComponents, and a UDataTable, along with a few other properties, to establish our example actor. It'll be a very rudimentary system to pull a row from the table, we'll use a simple indexed based system that be updated in the editor to pull a different row from the table.
MyWeapon.h
#pragma once

#include "CoreMinimal.h"
#include "GameFramework/Actor.h"
#include "MyWeapon.generated.h"

class UDataTable;
class USkeletalMeshComponent;
class UTextRenderComponent;

UCLASS()
class MYPROJECT_API AMyWeapon : public AActor
{
	GENERATED_BODY()

public:
	// Sets default values for this actor's properties
	AMyWeapon();

	virtual void OnConstruction(const FTransform& Transform) override;

	UPROPERTY(EditAnywhere)
	USceneComponent* MySceneComponent;

	UPROPERTY(EditAnywhere)
	UTextRenderComponent* MyWeaponNameText;

	UPROPERTY(EditAnywhere)
	UTextRenderComponent* MyWeaponDamangeText;

	UPROPERTY(EditAnywhere)
	USkeletalMeshComponent* MySkeletalMesh;

	UPROPERTY(EditAnywhere)
	UDataTable* MyDataTable;

	UPROPERTY(EditAnywhere)
	int32 MyIndex;

	UPROPERTY(EditAnywhere)
	UMaterialInstanceDynamic* DynamicMaterial;

	UFUNCTION(BlueprintCallable)
	void SetGun();
};
We've overriding OnConstruction to update the actor in editor. The MyIndex value will be a basic int32 that we update in the editor to change rows. The SetGun function will be the function we run inside OnConstruction.
The .cpp file is fairly simple. I set up up the actor in the constructor and in the SetGun function I find the row by index, then set the skeletal mesh, set the text components' text with name and damage, and then change the color of the mesh's material. There are few conditionals along the way in the function to ensure we don't crash the editor. Ultimately, this example is just trying to get info from the table and render it in the editor. One thing to note is that we included our newly created MyWeaponsStruct and that allows us to set the row variable type to use MyDataTable->FindRow<FMyWeaponsStruct>(Rows[MyIndex], ContextString).
MyWeapon.cpp
#include "MyWeapon.h"
#include "MyWeaponsStruct.h"
#include "Engine/DataTable.h"
#include "Components/SkeletalMeshComponent.h"
#include "Components/TextRenderComponent.h"

// Sets default values
AMyWeapon::AMyWeapon()
{
	// Set this actor to call Tick() every frame.  You can turn this off to improve performance if you don't need it.
	PrimaryActorTick.bCanEverTick = false;

	MySceneComponent = CreateDefaultSubobject<USceneComponent>(TEXT("MySceneComponent"));
#if WITH_EDITORONLY_DATA
	MySceneComponent->bVisualizeComponent = true;
#endif
	RootComponent = MySceneComponent;

	MySkeletalMesh = CreateDefaultSubobject<USkeletalMeshComponent>(TEXT("MySkeletalMesh"));
	MySkeletalMesh->SetupAttachment(RootComponent);

	MyWeaponNameText = CreateDefaultSubobject<UTextRenderComponent>(TEXT("My Weapon Name Text"));
	MyWeaponNameText->SetHorizontalAlignment(EHorizTextAligment::EHTA_Center);
	MyWeaponNameText->SetupAttachment(RootComponent);

	MyWeaponDamangeText = CreateDefaultSubobject<UTextRenderComponent>(TEXT("My Weaopn Damage Text"));
	MyWeaponDamangeText->SetHorizontalAlignment(EHorizTextAligment::EHTA_Center);
	MyWeaponDamangeText->SetupAttachment(RootComponent);

}

void AMyWeapon::OnConstruction(const FTransform& Transform)
{
	Super::OnConstruction(Transform);

	SetGun();
}

void AMyWeapon::SetGun()
{
	if (MyDataTable != nullptr)
	{
		TArray<FName> Rows = MyDataTable->GetRowNames();
		MyIndex = FMath::Clamp(MyIndex, 0, Rows.Num() - 1);
		static const FString ContextString(TEXT("Finding Row in Weapons Data Table"));

		FMyWeaponsStruct* MyRow = MyDataTable->FindRow<FMyWeaponsStruct>(Rows[MyIndex], ContextString);

		if (MyRow != nullptr)
		{
			MySkeletalMesh->SetSkeletalMeshAsset(MyRow->SkeletalMesh);
			MyWeaponNameText->SetText(FText::FromString(MyRow->Name));
			FText DamageText = FText::FromString(FString::Printf(TEXT("Damage: %.1f"), MyRow->Damage));
			MyWeaponDamangeText->SetText(DamageText);

			if (MySkeletalMesh != nullptr && IsValid(MySkeletalMesh->GetMaterial(0)))
			{
				if (MySkeletalMesh->GetMaterial(0)->IsA(UMaterialInstanceDynamic::StaticClass()))
				{
					if (DynamicMaterial != nullptr)
					{
						MySkeletalMesh->SetMaterial(0, DynamicMaterial);
						DynamicMaterial->SetVectorParameterValue(FName("Color"), MyRow->Color);
					}
				}
				else
				{
					UMaterialInterface* Material = MySkeletalMesh->GetMaterial(0);
					if (Material != nullptr)
					{
						DynamicMaterial = UMaterialInstanceDynamic::Create(Material, MySkeletalMesh);
						MySkeletalMesh->SetMaterial(0, DynamicMaterial);
						DynamicMaterial->SetVectorParameterValue(FName("Color"), MyRow->Color);
					}
				}
			}
		}
	}
}
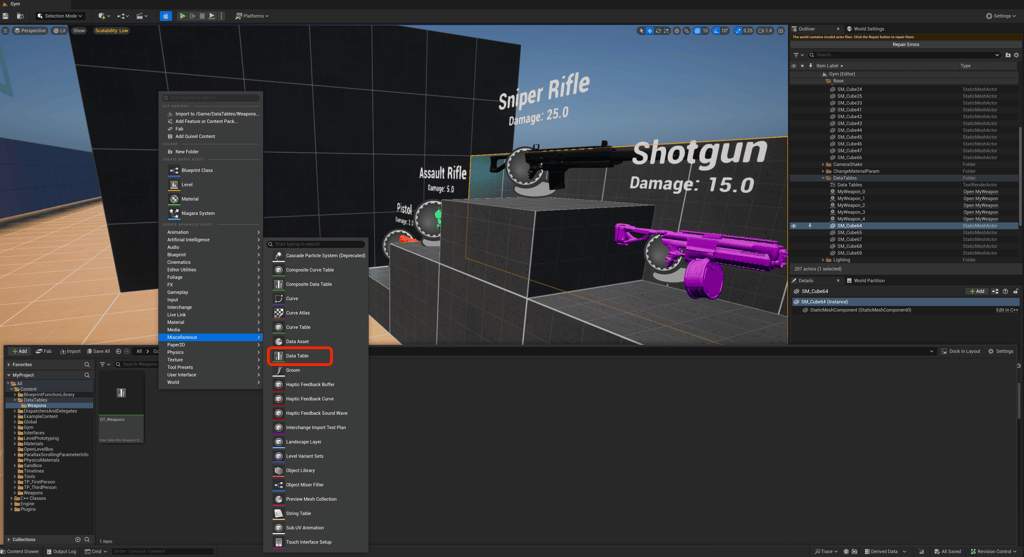
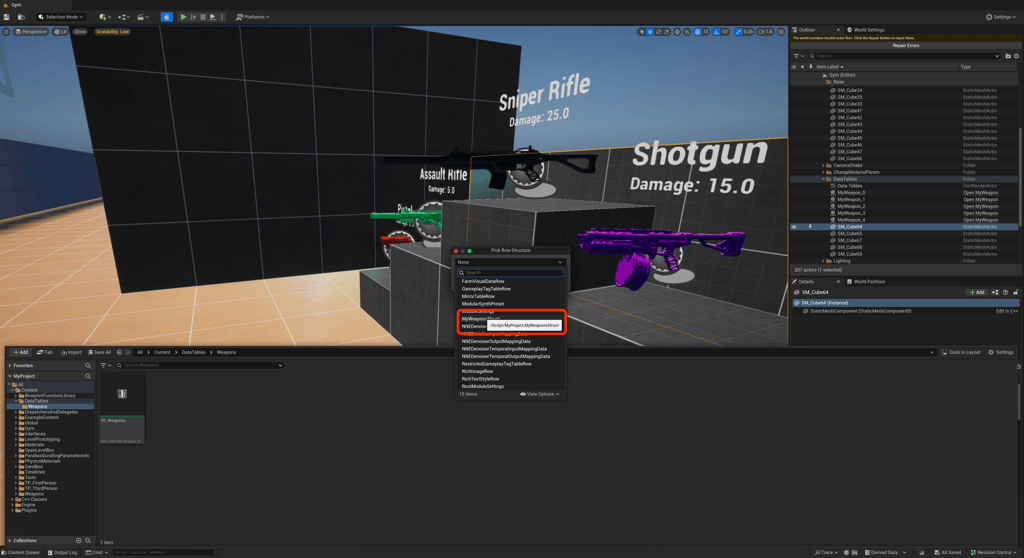
We can now create our DataTable inside the editor. This data table will use the MyWeaponStruct
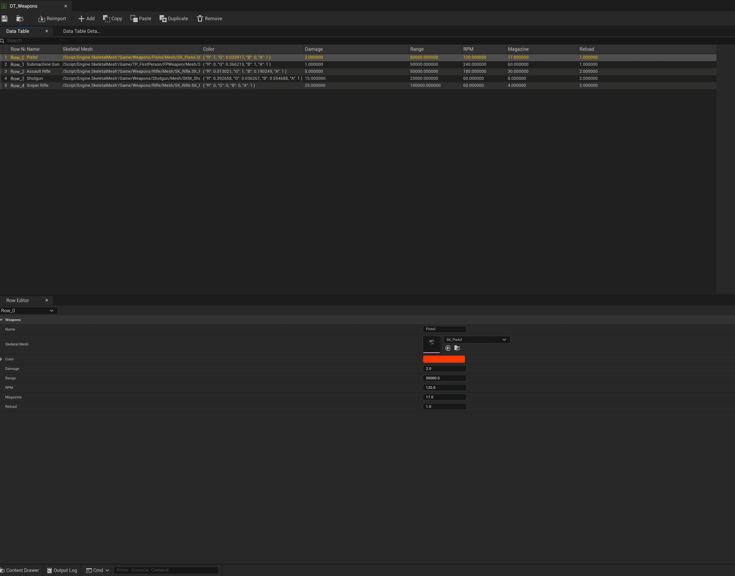
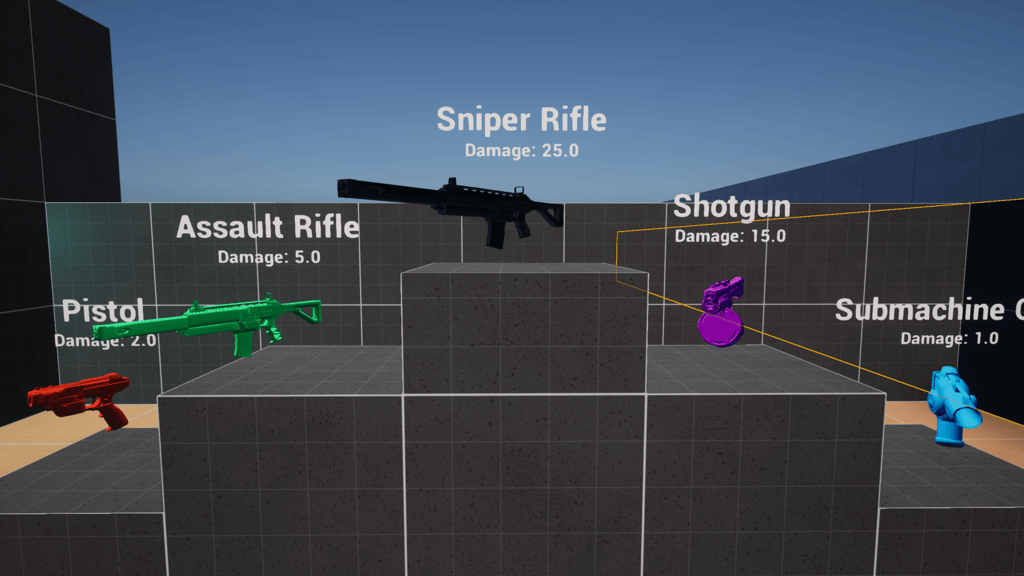
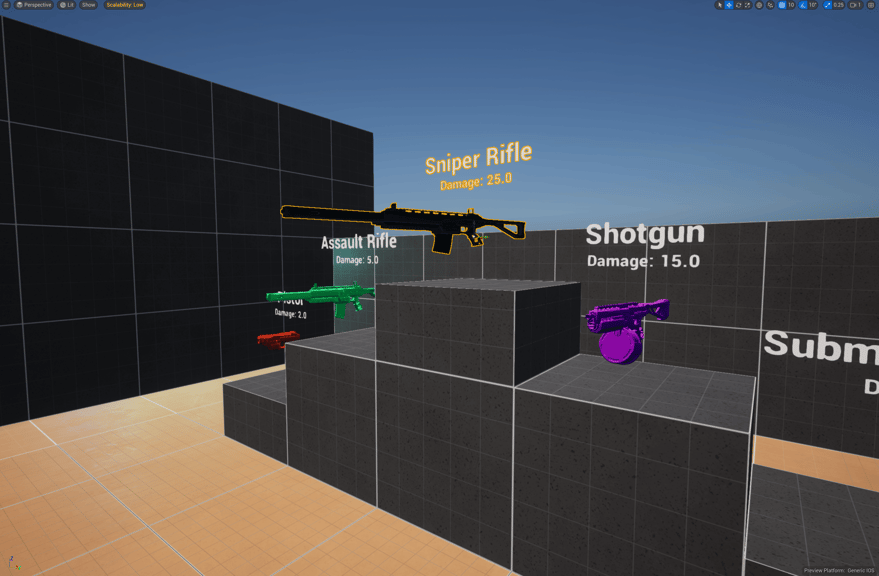
We now have all the pieces in place to start building our level. Drag in the new MyWeapon actor into the world, set the public MyDataTable variable and set the MyIndex variable to the row you want to showcase. In this example I also manually set the material to a material instance of a rotating material with a Color vector parameter. The custom material allows the weapon to rotate and consume an additional value from the table. I created one of these weapon actors then just duplicated four more to showcase all the weapons.
I had some fun setting this up, there were a couple of things that kind of tripped me up, but hopefully this helped.

Harrison McGuire