Using Custom Primitive Data to Change Material Parameters in Unreal Engine 5 Using C++
Another great way to change material properties is through using custom primitive data.
Game Engine
Unreal Engine 5.5.4
IDE
Rider 2024.3.7
Project Name
MyProject
OS
Windows 11
Recently Tom Looman posted a wonderful video regarding optimization in UE5 and in his video he mentioned using custom primitive data for changing material properties rather than dynamic material instances. I was very unaware of the concept so I definitely needed to try it.
Refer to Epic's Custom Primitive Data (CPD) documentation for an official breakdown of the workflow. In a nutshell custom primitive data can be a great way to change values of a material without needing to duplicate instances of material.
In this post I'll be following along with Epic's example of creating cubes that can change color, emissive strength, and size using CPD. In an earlier post regarding material scaling I touched on the scaling logic, but below is the CPD material used.
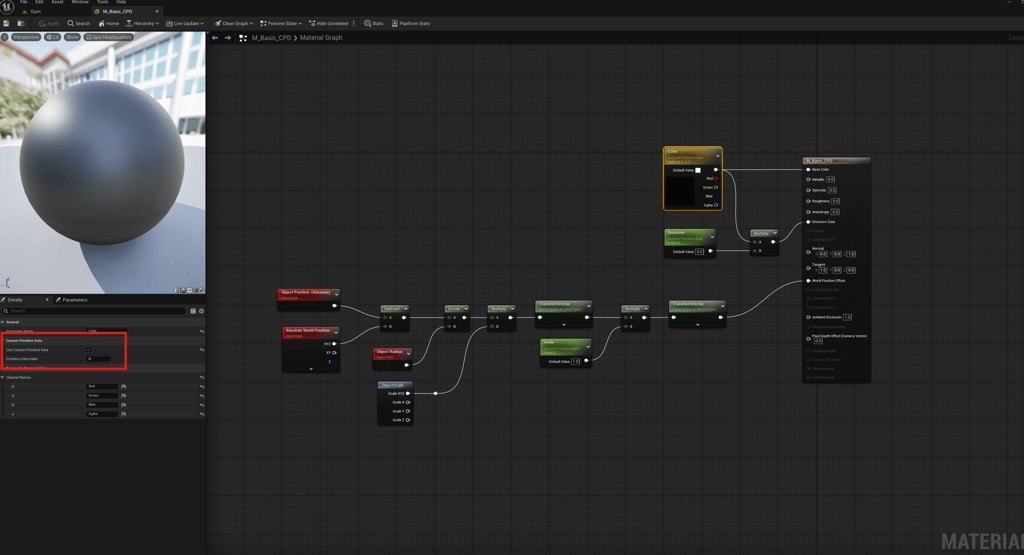
Color, Emissive, and Scale are the three variables we'll be using. Color is a Vector4 parameter while Emissive and Scale are both Scalar parameters. To make a value user custom primitive data you'll check box in the details panel and then assign it an index. This is a simple example, but some planning might be necessary for complex materials. There are 32 CPD indexes available and those indexes will allow us to indicate which value we want to change. Color is set as index 0, but since it's a Vector4 it consumes four indexes, zero to three, for all RGBA values. Emissive is index 4 and Scale is index 5. We'll set these values via C++.
To test the new material I created a new Actor, MyActorCPD, that simply has one StaticMeshComponent. We can add the new material to the mesh and set the values accordingly. Additionally, I have timer functions in the class to trigger the effects with a collision box in the GD Tactics gym.
MyActorCPD.h
#pragma once

#include "CoreMinimal.h"
#include "GameFramework/Actor.h"
#include "MyActorCPD.generated.h"

UCLASS()
class MYPROJECT_API AMyActorCPD : public AActor
{
	GENERATED_BODY()

public:
	// Sets default values for this actor's properties
	AMyActorCPD();

protected:
	// Called when the game starts or when spawned
	virtual void BeginPlay() override;

public:
	UPROPERTY(EditAnywhere)
	UStaticMeshComponent* StaticMesh;

	UPROPERTY()
	FTimerHandle TimerHandle;

	UFUNCTION(BlueprintCallable)
	void StartTimer();

	UFUNCTION(BlueprintCallable)
	void StopTimer();

	UFUNCTION()
	void TimerFunction() const;
};
Now in the MyActorCPD.cpp we can very easily set CPD values using SetCustomPrimitiveDataFloat or SetCustomPrimitiveDataVector4, for example: StaticMesh->SetCustomPrimitiveDataFloat(5, 10.0f);. This approach is much simpler than using Material Instance Dynamics where we need to get the material, create an MID, then set the variable by name, etc..., the CPD technique is very welcoming. In MyActorCPD.cpp I start by setting default values in BeginPlay then inside the TimerFunction I randomly set values for BaseColor, Emissive, and Scale to demonstrate the effect. Alternatively, for BaseColor, you can set each value individually, for example SetCustomPrimitiveDataFloat(0, Red), SetCustomPrimitiveDataFloat(1, Green), and SetCustomPrimitiveDataFloat(2, Blue), SetCustomPrimitiveDataFloat(3, Alpha).
MyActorCPD.cpp
#include "MyActorCPD.h"
#include "Kismet/KismetMathLibrary.h"


// Sets default values
AMyActorCPD::AMyActorCPD()
{
	// Set this actor to call Tick() every frame.  You can turn this off to improve performance if you don't need it.
	PrimaryActorTick.bCanEverTick = false;

	StaticMesh = CreateDefaultSubobject<UStaticMeshComponent>(TEXT("StaticMesh"));
	RootComponent = StaticMesh;
}

// Called when the game starts or when spawned
void AMyActorCPD::BeginPlay()
{
	Super::BeginPlay();

	if (StaticMesh != nullptr)
	{
		FVector4 BaseColor = FVector4(0.002428f, 0.138432f, 0.57758f, 0.1f);

		StaticMesh->SetCustomPrimitiveDataVector4(0, BaseColor);
		StaticMesh->SetCustomPrimitiveDataFloat(4, 0.f);
		StaticMesh->SetCustomPrimitiveDataFloat(5, 1.f);
	}
}

void AMyActorCPD::StartTimer()
{
	if (StaticMesh != nullptr)
	{
		GetWorldTimerManager().SetTimer(TimerHandle, this, &AMyActorCPD::TimerFunction, 1.0f, true, 0.f);
	}
}

void AMyActorCPD::StopTimer()
{
	GetWorldTimerManager().ClearTimer(TimerHandle);
}

void AMyActorCPD::TimerFunction() const
{
	const float Red = UKismetMathLibrary::RandomFloatInRange(0, 1);
	const float Green = UKismetMathLibrary::RandomFloatInRange(0, 1);
	const float Blue = UKismetMathLibrary::RandomFloatInRange(0, 1);
	const float Emissive = UKismetMathLibrary::RandomFloatInRange(-15, 5);
	const float Scale = UKismetMathLibrary::RandomFloatInRange(0.1f, 80.f);

	const FVector4 BaseColor = FVector4(Red, Green, Blue, 1.f);

	StaticMesh->SetCustomPrimitiveDataVector4(0, BaseColor);
	StaticMesh->SetCustomPrimitiveDataFloat(4, Emissive);
	StaticMesh->SetCustomPrimitiveDataFloat(5, Scale);
}
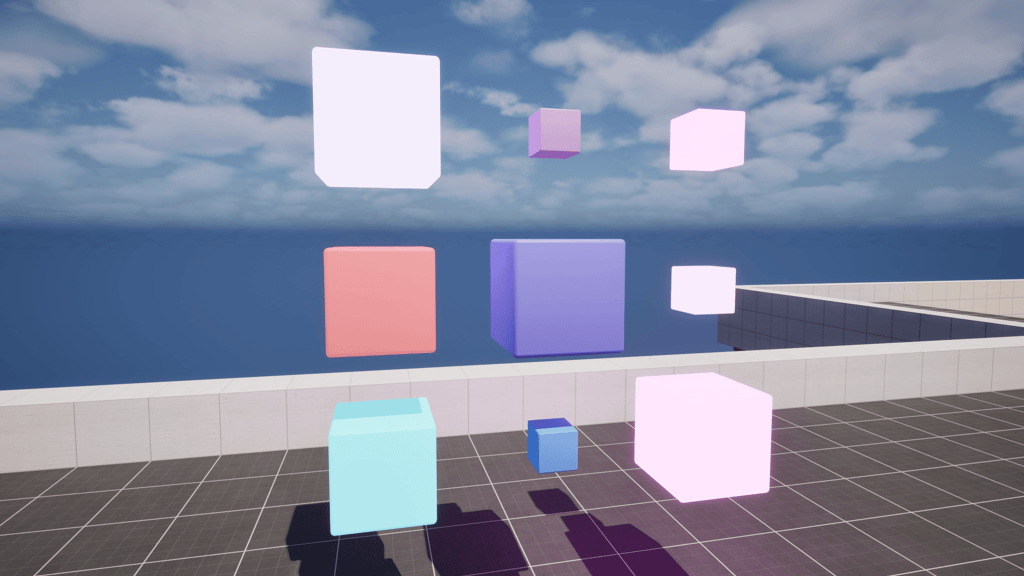
Below is the final result with the ever changing cubes.
I hope this helped, here is the direct link to the MyActorCPD source code. I was totally unaware of custom primitive data before Tom Looman's video, but now I'm definitely looking forward to using it more often.

Harrison McGuire